Tuesday 11 June 2013

Sheep are not Male.....however...........

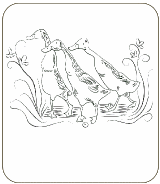
I still keep using this image for Male cards. I just like it, and don't think it's particularly girly...though would work as well of course. I think sunflowers are also a nice butch manly man flower too. At least that's what I'm hoping the 16yr old recipient of this card will think lol. 

This is to celebrate the Baptism of the son of a friend. Congratulations Joseph. 


The image is of course by the wonderful Mo Manning Coloured with good old Promarkers, the flowers and cute little bumbles are picked out with sakura glaze pens. 
My Flowers are from an arrangement I  dismantled - is that upcycling or re-cycling I'm never quite sure lol  

I'm entering this into the challenge over at Crafty Sentiments  
which this time is to make a card/project for a Male 


Monday 10 June 2013

Jewelry challenge and DT

First of all, I've had some good news this week, as I've been invited to join the DT over at Beading Friends Forever. Of course I was delighted to say yes as I've been following the challenges since they began in January, and have learned so many new jewelry techniques in that time. 

The new June Challenge over at Beading Friends Forever is as always a two part challenge. A tutorial to follow and make a 4 wrap macrame and bead bracelet. This was fun to make, and very easy even if you've never tried macrame or beading before. You can find the tutorial on the Challenge blog here 

Below is my first make, it's a very versatile pattern, 
so it's great to know that three entries are allowed. 


The second part of the challenge is to make a multi-strand project...three entries are allowed in this section also, and this is my first. 
                                                   
The winner is drawn randomly and gets £15 to spend at


Saturday 30 March 2013

Guess my Favourite Colour

These are my entries for the Favourite Colour part of the Beading Friends Forever Challenge.

This is a Tubular net lace bracelet watch, below is a close up of the dinky little daisy 'safety' chain I made for it. The Daisy chain video tutorial is here and for the tubular netting I followed the picture tutorial by Leigha of KnottyKnits Blog. It's super easy to follow.

The one below is an Ornate right angle weave, following the video tutorial by Beadaholic

I don't have a tutorial for this one, you'd have to buy the kit from Off The Beaded Path.


 This is also a variation of right angle weave, with emellishments on top. There are several tutorials 

All entered in Beading Friends Forever Challenge.....Double twisted Bracelet following tutorial provided, or favourite colour. 
T


Thursday 21 March 2013

Double Spiral Twist Bracelets

This is the first....and the last one I made. It took me ten goes to get it made in the first place, and then seeing it after I'd made the others I was completely dissatisfied with it and ripped it out and made it again lol. After all that works it's going to take a lot to part with it lol. I enjoyed this pattern, once I'd remembered to turn it side to side as I was making it (to create the spiral) it was easy peasy. It's so beautifully pliable in the hands too. The first is with pale gold and old bronze beads.

No 2 obviously red and white, I like this one

Cream and White

I had to make a pink one didn't I 

Despite how it looks on the pic, this is cream and burgundy
 

They are all for the March challenge at Beading Friends Forever which is where you'll also find the tutorial video to make the bracelet. You'll also find links to Beading Friends Forever Facebook pages. The alternate option for the challenge is to make a beaded project in your favourite colours.


Tuesday 26 February 2013

.......and finally!

Hugs and Kisses bracelet No 4.

I used Preciosa Glass beads in silver and hematite grey, and black and silver lined clear seed beads size 11.0. From Beads Direct and stash.

This is again entered for
Beading Friends Forever - Anything Goes or Hugs & Kisses Bracelet using tutorial

The challenge ends when the month does, I'm so looking forward to trying the tutorial with the next challenge.


Friday 22 February 2013

At the Risk Of Boring you

I have made another Hugs and Kisses Bracelet  it really is a fun pattern, and such a simple step by step tutorial, great for a beginner. I have made a forth, which will be inflicting on you as soon as I can get a picture of it.  

My third hugs and Kisses bracelet has champagne, amber and brown glass beads, with champagne 11.0 seed beads. Beads are from Beads Direct, Bead Shop Manchester, ebay and stash. I've used a   magnetic clasp.

Beading Friends Forever - Anything Goes or Hugs and Kisses bracelet following tutorial


Thursday 14 February 2013

Two Tone Hugs & Kisses

My Hugs & Kisses Bracelet this time is in Purple with white glass pearl beads.

My supplies are mostly stash,  the heart charm, and  possibly the toggle fastner are from Beads Direct. 
My craft creations - Jewellery in two colours ends 15th feb
Beading Friends Forever - Anything Goes or Hugs & Kisses Bracelet following tutorial provided


Monday 11 February 2013

Hugs & Kisses Bracelet

This was made following the tutorial posted on a brand new challenge blog Beading Friends Forever. It's a new style of beading for me, and a lot of fun. The tutorial was very detailed and easy to follow. I've made another couple of versions which I'll post as soon as i get pictures. If you enjoy jewellery making I'd recommend giving this a go. 

Dusky pink glass pearls from Beads Direct 
Other beads stash. 


Beading Friends Forever Challenge - Anything Goes, or Hugs and Kisses Bracelet following tutorial. Ends 28th Feb


Wednesday 16 January 2013

WOYWW 189


 It's been a good long while since I played along with WOYWW over at Stamping Ground, but I wanted to show of a new tool given to us (my daughter and myself) by a dear friend. My crafting is done from my bed for the past couple of years, and I'm forever losing just the very thing I wanted, off the side of the bed, or in the bedclothes lol. The Buddy Board has all these lovely strong bungees that fit over the toothed edge, and nothing, just nothing can escape from you.

It was wonderful to be able to get out all the colours I need, and not have to put them away when I'd had enough...only to try and remember which colours I was using when I feel up to doing a little more. It can just stay on the board until all is completed......an absolute little wonder, and such a clever idea. The work surface of the board is A4. You can find it HERE (in UK at least), there is a video link with it.

Image is a little darling by Mo Manning, pencils are mixture of Lyra and prismcolor - oh and an undercoat of promarkers (I'd not put much pencil on him yet)...I always have to lay down a light colour in promarker, then add pencil, otherwise I feel overwhelmed by all the white. Yes, I know I sound barmy, but so it is.


Related Posts Plugin for WordPress, Blogger...
 

Lindy's Maid Wid Luv Copyright © 2010 Blog make-over by Creation Faeries