Tea Time
-
It's windy out there and sky is darkening more and more. It's Ophelia, or
what ever is left of this hurricane, coming for a visit. We are all safe
and well...
To the Farthest Shores by Elizabeth Camden
-
I don't how authors like Elizabeth Camden do it. They come up with the most
interesting story lines and every book is different and intriguing. I feel
li...
Thank you Card
-
Hello out there in cyber space!
Here's my latest card.
I saw this on a card making group, & thought it was very cute. It was very
easy to make. I made...
Wedding Card No. 1
-
top left: envelope
top right: wedding card
This is a truly "international" wedding card!
I bought the card base in Croatia, the picture frame for the envelo...
Project Life June Blog Hop
-
Hi and welcome to our June Project Life Blog Hop for our Project Life
Connection Group “Project Everyday Blessings”
We are comment to sharing with you each...
Please Feel Better Soon…
-
Hi again! I’ve let my get well and thinking of you cards get a little low.
So I decided to get a few done. This is such a cute image and is one of
the fi...
Coloring Brown Hair on Kraft
-
Hi Guys!
I have a new coloring tutorial for you today. Previously I showed you red
hair on kraft .You can find it here. Today I am showing you how I color...
Chocolate Makes My Mouth Happy
-
This awesome sentiment by TLC says it all! I have used it before and it
rocks! Anyone that knows me knows I have a thing for chocolate. It may
possibly, ...
Google Friends connect Closing
-
so, in case you're wondering what the LINKY follower thingy is on the top
right of my sidebar..... in case you haven't heard, *GOOGLE FRIENDS
CONNECT* is ...
Not Happening
-
Eli is not going anywhere. I will never entertain the notion of losing him
or any of the furbabies in our family again.
Eli is not just a family pet, which...
Beautiful Boxes
-
In this post I have put together all the pictures of gift boxes I made from
the date of this post till now. I will keep adding more as I make them.
Hope y...
Homeschooling
-
Sending my child to receive an institutionalized education is right up
there with the worst decisions I have ever made.
It is sad that the best education p...
Happier Days
-
Hello everyone! I hope you are are all well. I love this time of year, with
exception to all of the allergies associated with spring in my part of the
worl...
its been awhile
-
Okay I haven't felt much like blogging lately but not sure if anyone
actually reads them anyway so then ya have to wonder why on earth am I
writing into th...
Beautiful pictures
-
Originally uploaded by rosemary*
This photographer has some of the most beautiful pictures I have seen. You
have to check them out.
elann.com - Knitting Yarn at Irresistible Prices
-
elann.com - Knitting Yarn at Irresistible Prices
Great place for some beautiful free patterns to knit. I am more of a
crocheter, but these sweaters and ot...
I love a Green Gnome? and a freebie sentiment
-
Hello, everyone!
Back in December 2025 (yikes!) I enjoyed a wonderful playdate with my
friend Ana. She brought this cute Woodware Gnome Stamp which she ha...
Mid June - We Love Stamping
-
Time for a reminder about our June challenge at We Love Stamping, where we
are all about making the stamping the focal point of the project. This
month...
It’s a Sloth World
-
I just love this comical little guy. I smile just looking at that sweet
face, I hope it makes you smile too. This is actually the first start to
finish...
Happy New Home!
-
Hi everyone!
For some reason, this card didn't post when it should have, despite
my post being scheduled! I apologise if you've been waiting for it!
Here ...
New name, new blog
-
Please click HERE to get to our new blog!!
While we have a huge following, we found there were some who thought we
were a blog about playful cats. They...
I'm back! Brain tumor surgery
-
*Happy New Year Everyone!*
*It has been almost two looonnnng years since I posted. So much has
happened. I do work a "real" job and this is my fun, and...
I have a winner for my butterfly die cut Candy. No grandson to pick it out this time, sadly, so had to do it myself, with hubby as witness and taking the pic. With no more adieu...here she is....
Congratulations Mervi, please contact me by email linda.wescott at blueyonder.co.uk with your postal address, and I'll get this right off to you. I'll be back with more candy when I hit 200 followers.
Wow, I hit 150 followers today. In appreciation of all my old and new followers I'm offering this little bit of candy. A beautiful lacey butterfly die cutter by Marianne Designs.....I have one of these myself and you'll be seeing it in the next card I post. It measures around 3 1/2 by 2 1/2 inch.
Now I know that not everyone has a die cutter so for those I've put this stamp set for you instead.
It's from the 'flipping' range by Lapash...as you can see it has front and rear view of the stamps, and a few little extras on it too. The main images stand around 4 ish inches (measured by thumb lol).
It's an either or option, I won't be giving both away....the other will be put back in with my big 200 followers (I'm an optimist lol)
Putting this up for just over a week, it will be drawn on Sun 27th Feb. You only have to be a follower and leave a comment to enter. If you'd like to put my candy in your sidebar I'd appreciate it, and if you leave a comment telling me, it will get you a second chance at the draw...... but it's not necessary. If you do link a pictures please use the one of the butterfly.
I've made this for a few Spring challenges, and also paper piercing/pricking which is the theme of my Card Swap this month. I chose to prick all around the edges of the leaves - hopefully you will see better on one of the close ups.
For my shading I followed the colouring Barbara (the designer of the image) - you can find the pic here. I'm happier with my hair than I usually am...don't think I quite got there with the dress though. I'm pleased with my improvement so thank you Barbara :-)
I made some stick pins to match using some little daffodil style beads I have, and twirled some green wire into sprirals (springs) to embellish. My flowers were cut with the tiny centre of die cutters, the pinking circle, a plain circle and the wonky square. I love using the wonky square to make flower, it makes great pointed petals. They were cut from white card and I edged around with yellow tulip promarker while the paper was damp and before I scrunched them up....made the ink spread about unevenly to give a nice effect.
An upstanding view taken by my resident photographer, hubby Ken.
Some close ups of the embellishments and details.
I added beads to the end of the twirled wire on this one, bit blured but how you get the idea.
Receipe....
DP's - Craft Creations Green Meadow
Colourants - Promarkers
Die Cutters - Nesties
Image - Summer Breeze by Little Miss Muffet Designs
Thought I'd give WOYWW another whirl as I had so much fun last week, you can join in the fun on Julia's Stamping Ground's blog.
I threw everything together on the coffee table again to show you what I'm working on this week. A spring flavoured card. My image, which only has skin coloured so far, is Summer Breeze by Little Miss Muffet Stamps. You can see her here on her designer, Barbara's, blog - Forgotten Scraps. I've made the paper flowers myself...not sure how many of them I'll use on the card, or decided which of the papers, other than the striped.
Now below, because I'm never working on one thing at a time (not being able to have all my craft stash in with me), you can see the crocheted roses I've started on. I've some fine gauge crochet cotton, and a few skeins of embroidery yarn. These are the only ones I have as skeins....I cut all my yarns into usable sized pieces ready for the needle...pic at bottom of post.
I only have the one sewn up yet.
How they look before sewn into a rose.
My embroidery yarn storage. Strips of card with holes punched down the edge, and the colour numbers against them. When making a project I make a separate punched card and put all my selected colours on it to keep them tidily with the work.
This is for a dear friend of mine who loves bling...I discovered how much when I had her over for a card party and I sat trying to hide my dismay as she piled all my best bling onto one card, front, inside and back lol. Of course I've learned not to get anything out I'm going to cry about after it's all gone lol.
The card stock I used here is the Alchemy gold again...so love this, it shimmers, glitters and shines as you move it. I used an entire A4 sheet plus some off cuts to cut out loads of die-cuts....it would have needed to be an A3 sized card to fit them all on lol. I'll be using the rest on another card - or two!! The butterfly is supposed to be lacy, but I didn't knock out all the bits...I glued the back of it to secure them. I liked the embossed look and wanted to add some glitter...just some cheap superfine stuff I found in my stash. The holographic butterfly sticker is gold too.
This is one of my handmade mulberry paper flowers (saw tissue paper flowers on Debra Blog, you can see one of her's here. Just look there, I've even got round to using some fancy head pins I made.
I'm hoping I'm not too late for all the monochrome challenges.
I like to use pinflair glue gel (non silicone based, odourless) to get the layers at different heights and also angle the pieces.....gives a bit of room for manoeuvre too.
I sent him to Hobby Craft for some gold coloured head pins, a bag of beads and glaze accents...he got a little carried away. He rang and said he could stay their all day but thought he'd better come home lol.
He did mention he'd look for a storage box for himself, but just look at all the other goodies. The butterflies are 3d and I can't wait to play with some of those novelty buttons. To think just a year ago this man wouldn't have understood what the word embellishment meant.
A close up of his new stash...don't worry girls, we have house rules - what his is mine (shhhhh what's mine's my own LOL)
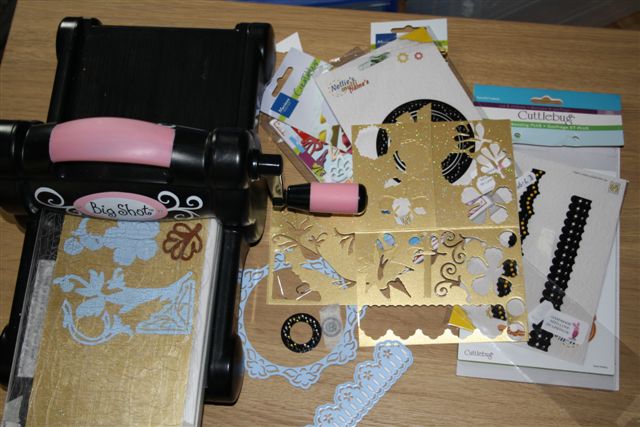
This is my first time ever unveiling of WOYWW. I don't strictly speaking have a work space...in the sense of a desk or table. The pic above is the coffee table in the living room where my beloved bigshot lives. Here you see all the bits I've been using for a gold on gold card I'm making.
Below is my 'lap-tray'. What it really is, is the lid of my largest storage box, I have a cushion on my lap, with the lid on top and it fits across the arms of my chair. This way I can craft in my daughters sick-room. My laptop is sitting on top of it right now of course, as I type this. See my embossing tool on top of the card...about to be used to score the centre fold...I broke it pressing too hard so glued paper around to fix it.... so!!....it's a good tool!!....been like it for years and still works lol.
That is my crafting pair of glasses you see right there...I wear bi-focals, but I put this pair on with them and use them like a magnifying lense.
Hopefully I'll be showing the finished card in a few days. This is the main problem. I have to do everything 'piece-meal' (do you have that in America - means one part of the job is done and then passed on to someone else for the next part). I have to get a few bits out, put them away (on my to be put away pile) and get a bit more out - some stuff has to be done in another room...makes the process much longer. Still, at least it means I can craft.
Below we have a pic of what was on my work space before I gathered all my stuff together. I thought I'm having a picture of that darn cat (I mean darling princess) as that is my very last sheet of shimmery gold card she's sitting on. I'm going to tell you where I got it from because although it looked all ruckled up under her, it came to no harm. It's Craft Creations and called Alchemy Pearlescent, I have to buy more now!!!
She's about 8 - a previously owned cat - and I called her Seri, short for serene as she just has such a serene vibe....until the other cat chases her or my elderly, half blind, harmless yorkie (also previously owned) wonders in reach of her paw...the serenity dents a little then lol.
I arrange my beads on the pin, alternating tiny with larger ones, and mostly have the largest at the top. Some large beads will slide right off the top of the pin. You need a tiny bead, bead cap, or even a sequin to stop that.
Holding the pin at the bottom to stop them falling off, I add a blob of glue right at the top
You can simply glue the very last bead on the pin, but I like to glue them all with a clear drying tacky glue (Hi-tack FAST tack glue) and then use a metal/glass glue (UHU) on the very last bead to make sure they are secure. (It stinks so have to do that bit away from my daughters sick bed).
I twist the bead around the pin as I push it up to the top - notice there is a lot of glue squeezed up. I add another blob before the next bead and keep repeating to the end.
As you can see there is plenty of glue in between each bead.
So this is where you need the wet wipe. Gently remove the excess glue and leave to dry.
If gluing the whole lot with a metal/glass glue it would probably be best to clean the excess as you go along. You can only mix a little of it at a time and have to use it up within about 5 mins. In the video link I've put below she uses Glossy Accents to secure them.
With some of my pearly coloured pins I've been able to change the colour with my promarkers. I used sequins as spacers with some of my pins. Don't be afraid to experiment. A jump ring or two in between beads is a nice look too, or even wire wrapped tightly around the pin. If you use eye pins (they have a tiny loop at the top) you will be able to add charms to the top of the pin too using a jump ring to join them together.
Equipment needed.
Pins
Glue that will secure metal/glass/plastic
varous sized beads
Wet Wipes.
Optional extras
eye pins
silver or gold coloured spacer beads.
ditto bead caps
jump rings
bungle beads
sequins
Now for the offer (not open to those already on my list to receive made up pins). I will give a small kit...to make 6 fancy pins.. to the first 5 followers to specifically request them in a comment. Make sure you read the comments prior to your's to see if you'll still qualify.
A few extra pix. Thanks to my Hubby who acted as the photographic half of the tutorial team lol.
These have bead caps
These are made with hat pins...they come with the tear drop bead attached.
The box of goodies I work from...lots more beads elsewhere though.
You could also do a google search for the following in your area.
jewellery findings/spacer beads
head pins/eyepins
bead caps
Florist supplies/corsage pins
This is 60 pearly pins, made them recently while too ill for any 'brain-work'. Doesn't look like 60 does it lol. I'm going to give 6 each to the first five followers to leave me a comment. Some of them are actually hat pins...I won't be risking posting any of those sharp pointy babies. Before you rush to comment, read on...in a day or two I'm going to put some instructions etc on how they are made, and will offer kits to make some yourself.
All you have to do now is decide if you want them ready made, or want to wait and have a kit. You only have to be a follower to enter and make sure I have a way of contacting you.
When I made this card (card's really as I made three) there were so many challenges for Red/red & black/red, white and black...of course I've missed most of them. Just wasn't well enough to post at the time. Still hoping to find a few red's left. It's another of the funky fold cards. All three are some kind of variation on the theme...I needed them all at once, isn't it always the way eh!!. My images are all from Card Mad Fairy and felt they looked really dramatic left in black and white. I even decorated the inside of the cards, though only got scan of the first one.
I'd like to show you the photo's I took with my new camera, but since my laptop was taken away and 'fixed' I haven't been able to put any software on it. Can't upload from camera, no photoshop....no wireless printer......he fixed it good and proper didn't he. grrrrrrrrrrrr.
Receipe...
Cardstock - 12 x 12 stash.
DP's - Papermania Persimmon Collection.
Die cuts - ditto
Flowers - ebay and inked edges in black acetate pen
Last week I came across a whole load of madellions I'd drawn a few years ago when I was bedridden. Not had chance to scan them all yet. This one's quite elaborate but hope you'll still find a use for it.
You are welcome to it, hope you'll leave a comment if you take it. Usual copywrite stuff, don't claim it as your own etc and I'd love to see a pic if you do use it. Please feel free to take any of the other freebies too, button in toolbar above.
I think this is quite a clean looking card....for me anyway. Not exactly clean and simple of course, but less busy than usual. The papers I used are a kind of paper ribbon that I cut into thin strips, the silivery paper at the centre is a bit of old wrapping paper....yes I'm one of those who open my parcels very carefully and knowing how many avid re-cycler s are out there I'm not afraid to say it lol.
The faceted stones at the centres are clear but the others are all a set of three of one of the iris colours (complicated sentence), only the pink showing up though. My appature card is an ultra slim (not a word Dorcas!!) DL and is part of a cheap bulk buy from years ago. Every thing is from stash.
I came upon this great Challenge site while blundering around in blogland and thought it fun. It's called Flashback Friday Challengeand it's just what it says on the tin....you flashback to an old card you posted. Now, if only for the fact that you get to break the prime rule of all the challenges...no old posts, it also gives you a chance to go sifting back to look at what you did in the past. For me that's not so far really. This was posted on the 4th Sept just last year, and was one of my first cards. Original post here
The challenge is to show your first glitter card, this is it and it's pretty liberally daubed in glitter paste. It was fun to do, and I just love House Mouse stamps....and I'm still quite pleased with it too, which is a bonus.